Roof Flashing: Why It’s Important
and How to Replace It Roofing
Kick Out Roof Flashing: Why It’s Important and How to Replace It Roofing is an essential aspect of any building project. A pivotal part of this process is installing the kick out roof flashing. This small but mighty component can save your home from potential water damage. It works by directing water away from the walls and into the gutters, a simple task with a massive impact. This blog post will provide an in-depth look at kick out roof flashing, explaining what it is, why it’s important, and how to properly install it. Get ready to take your roofing knowledge to the next level!
What is Roof Flashing?
Introduction
In the world of roofing, there are many components that work together to keep your home or building protected from the elements. One element that often goes unnoticed is roof flashing. While it may not be the most glamorous part of a roof, it plays a vital role in preventing water damage and maintaining the integrity of your roof. In this section, we will explore what roof flashing is and why it is essential for your roofing system.
The Purpose of Roof Flashing
Roof flashing is a thin, weatherproof material that is installed at vulnerable areas of your roof to prevent water penetration. Its main purpose is to create a watertight seal between roof sections, joints, and transitions. By redirecting water away from these vulnerable areas, roof flashing helps to protect your home from leaks and water damage.
Types of Roof Flashing
There are several types of roof flashing, each designed to address specific areas of vulnerability on a roof. Here are some common types of roof flashing you may come across:
- Step flashing: This type of flashing is commonly used where the roof meets a vertical wall, such as a chimney or dormer. Step flashing is installed in a “step-like” pattern to create a barrier against water infiltration.
- Valley flashing: Valley flashing is installed in the valleys of a roof, where two roof sections meet and form a trough. Its purpose is to channel water down the roof and away from your home.
- Vent pipe flashing: As the name suggests, this type of flashing is used around vent pipes that protrude through the roof. It creates a watertight seal around the pipe to prevent water from seeping into your home.
- Drip edge flashing: Drip edge flashing is installed along the edges of your roof to direct water away from the fascia and prevent it from seeping into the underlying structure.
The Importance of Roof Flashing
Properly installed and maintained roof flashing is for the long-term performance of your roof. Without adequate flashing, water can seep into your home, causing extensive damage to the roof deck, insulation, and interior of your property. Over time, this can lead to costly repairs and even compromise the structural integrity of your home.
Roof flashing acts as a barrier against water infiltration, preventing leaks and protecting your home from potential water damage. By investing in high-quality flashing materials and ensuring proper installation, you can safeguard your roof and extend its lifespan.
Signs of Damaged Roof Flashing
Roof flashing is a critical component of your home’s roofing system. It helps keep water out and prevents leaks, ensuring the integrity of your roof. However, over time, flashing can become damaged due to various factors such as weather conditions and aging. In this section, we will discuss the signs of damaged roof flashing that you should be aware of to protect your home.
Visible Leaks and Water Damage
One of the most apparent signs of damaged roof flashing is visible leaks and water damage inside your home. If you notice water stains on your ceiling or walls, water has likely penetrated through compromised flashing. These leaks can cause further damage to your home’s structure, leading to costly repairs if left unaddressed.
Loose or Missing Flashing
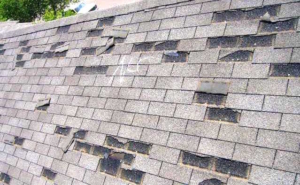
Another indicator of damaged roof flashing is loose or missing flashing. Flashing can become loose over time due to wind, temperature changes, or improper installation. Additionally, harsh weather conditions can cause sections of flashing to be completely torn off or go missing. When flashing becomes loose or goes missing, it leaves vulnerable areas of your roof exposed to potential water damage.
Rust or Corrosion
Rust or corrosion on your roof flashing is another sign of damage that requires attention. Over time, exposure to moisture and fluctuating temperatures can cause metal flashing to corrode or rust. This compromises its effectiveness in diverting water away from vulnerable areas of your roof. If you notice any rust or corrosion on your flashing, it is crucial to address it promptly to prevent further deterioration.
Cracked or Deteriorated Caulking
Caulking is often used to seal the joints and edges of roof flashing, providing an extra layer of protection against water intrusion. However, over time, caulking can crack or deteriorate due to age, weather conditions, or poor quality materials. Cracked or deteriorated caulking can lead to water seepage, increasing the risk of leaks and water damage. Regularly inspecting and maintaining the caulking on your roof flashing is essential to ensure its integrity.
Why is it Important to Replace Damaged Roof Flashing?
When it comes to maintaining a roof, one crucial element that often goes unnoticed is the flashing. Roof flashing is a thin, weather-resistant material that is installed around chimneys, vents, skylights, and other roof protrusions to provide a watertight seal. Over time, however, flashing can become damaged due to exposure to the elements, age, or poor installation. In this section, we will explore why it is essential to replace damaged roof flashing, focusing on three key aspects: preventing water damage, protecting the structural integrity of the roof, and enhancing energy efficiency.
Preventing Water Damage
One of the primary reasons why it is important to replace damaged roof flashing is to prevent water damage. Flashing acts as a barrier against water intrusion, directing rainwater away from vulnerable areas of the roof. When flashing becomes damaged or deteriorates, it can create gaps or openings where water can seep through, causing leaks and potential water damage to the underlying roofing materials, ceilings, and walls. By promptly replacing damaged flashing, you can avoid costly repairs and prevent the development of more significant issues such as mold growth and structural damage.
Protecting the Structural Integrity of the Roof
The structural integrity of your roof relies on various components working together seamlessly, and flashing plays a crucial role in this system. Damaged flashing can compromise the integrity of your roof by allowing water to penetrate and reach the underlying layers. When water seeps into the roof structure, it can weaken the wooden framing, rot the sheathing, and even lead to the deterioration of insulation. By replacing damaged flashing, you can maintain the overall strength and durability of your roof, ensuring it can withstand the elements and protect your home for years to come.
Enhancing Energy Efficiency
Replacing damaged roof flashing can also contribute to enhancing the energy efficiency of your home. Flashing helps to create a tight seal around roof penetrations, preventing air leakage and heat transfer. When flashing is in good condition, it helps to maintain a consistent temperature inside your home, reducing the need for excessive heating or cooling. Damaged flashing, on the other hand, can allow air to escape or enter your home, leading to energy loss and higher utility bills. By replacing damaged flashing, you can improve the energy efficiency of your home, reducing your environmental impact and saving money on energy costs.
How to Kick Out Roof Flashing?
Roof flashing is an essential component that helps to prevent water leakage and maintain the integrity of your roof. However, there may come a time when you need to replace or repair the flashing. In this section, we will guide you through the process of kicking out roof flashing, ensuring that you can tackle this task confidently and safely.
Safety Precautions
Before you embark on any roofing project, it’s crucial to prioritize safety. Here are some safety precautions to keep in mind when kicking out roof flashing:
- Wear Protective Gear: Always wear appropriate protective gear, including gloves, safety goggles, and a dust mask, to protect yourself from potential hazards such as sharp edges and debris.
- Work with a Buddy: It’s advisable to have someone present to assist you during the process. They can provide an extra set of eyes and hands, ensuring your safety and the success of the project.
- Use a Sturdy Ladder: When accessing the roof, make sure to use a stable and properly positioned ladder. Ensure that it is in good condition and securely placed on a level surface.
- Watch Out for Electrical Hazards: Take note of nearby power lines and electrical equipment. Make sure to maintain a safe distance to avoid accidents.
Tools and Materials Needed
To kick out roof flashing effectively, you will need the following tools and materials:
- Pry bar or flathead screwdriver: These tools will help you remove the existing flashing.
- Utility knife: You’ll need a sharp utility knife to cut through any sealant or adhesive used to secure the flashing in place.
- Replacement flashing: Depending on the type of roofing material, you may need metal flashing or a specialized rubberized flashing product.
- Roofing cement or sealant: This will be necessary to secure the new flashing in place and create a watertight seal.
- Roofing nails/screws: Depending on the type of flashing and roofing material, you may need nails or screws to secure the flashing.
Step-by-Step Guide
Now that you have your safety precautions in mind and the necessary tools and materials ready, let’s dive into the step-by-step guide on how to kick out roof flashing:
- Inspect the flashing: Start by examining the existing flashing for any signs of damage or wear. Look for cracks, rust, or loose sections that indicate the need for replacement.
- Loosen the existing flashing: Gently insert a pry bar or a flathead screwdriver under the flashing to loosen it. Take care not to damage the surrounding roofing material.
- Remove the old flashing: Once the flashing is loosened, carefully lift and remove it from the roof. Use a utility knife to cut through any sealant or adhesive if necessary.
- Clean the area: Before installing the new flashing, ensure that the area is clean and free from debris. Use a broom or brush to sweep away any dirt or loose particles.
- Cut the replacement flashing: Measure and cut the replacement flashing according to the dimensions of the area you need to cover. Ensure a proper fit before proceeding.
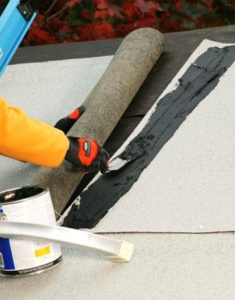
- Apply roofing cement: Apply a generous amount of roofing cement or sealant to the underside of the replacement flashing. This will help create a watertight seal once installed.
- Secure the new flashing: Carefully position the replacement flashing over the area where the old flashing was removed. Press it firmly into place, ensuring a snug fit against the roof.
- Fasten the flashing: Use roofing nails or screws, depending on the type of flashing, to secure it in place. Make sure the fasteners penetrate the roofing material to ensure stability.
- Apply additional sealant: To reinforce the seal and protect against water infiltration, apply roofing cement or sealant along the edges of the flashing.
Benefits of Hiring a Professional for Roof Flashing Replacement
Roof flashing is a component of any roofing system. It helps to prevent water leaks and directs water away from vulnerable areas of the roof, such as chimneys, skylights, and vents. Over time, flashing can deteriorate and lose its effectiveness, leading to potential water damage and costly repairs. When it comes to replacing roof flashing, hiring a professional is the best course of action. Here are the key benefits of entrusting this task to a skilled and experienced roofing professional:
Expertise and Experience
Roof flashing replacement requires specialized knowledge and skills. Professionals in the roofing industry have undergone extensive training and have years of experience working with various types of flashing materials and roof designs. They possess an in-depth understanding of the installation techniques and can ensure that the new flashing is properly installed, providing optimal protection against water infiltration. Their expertise allows them to identify any underlying issues with the roof and make necessary repairs, further safeguarding your home from potential damage.
Time and Cost Efficiency
While some homeowners may attempt to replace roof flashing themselves, it is a complex task that can be time-consuming and may lead to costly mistakes. Professionals, on the other hand, have the necessary tools, equipment, and knowledge to complete the job efficiently. They can quickly assess the condition of the existing flashing, recommend the most suitable replacement materials, and complete the installation in a timely manner. By hiring a professional, you can save yourself the frustration and potential expenses associated with trial and error.
Warranty and Guarantee
When you hire a reputable roofing professional for your flashing replacement, you can expect a warranty or guarantee on their workmanship. This means that if any issues arise after the installation, they will address them promptly and at no additional cost to you. This peace of mind is invaluable, as it ensures that you are protected against any potential defects or installation errors. Many roofing manufacturers offer warranties on their flashing materials, which can only be fully honored if a certified professional performs the installation.
Conclusion
In conclusion, removing and replacing damaged or faulty roof flashing is essential for maintaining the structural integrity of your roof. By addressing issues with your roof flashing promptly, you can prevent water leaks, mold growth, and subsequent damage to your home. Remember to hire a professional roofing contractor to ensure the job is done correctly and avoid potential safety risks. Regularly inspecting and maintaining your roof flashing will contribute to the longevity and performance of your roof, ultimately saving you time and money in the long run. Don’t delay – address any flashing issues today to protect your home from potential water damage.


