Top Tips for Rolled Roofing DIY Installation Guide
Installing rolled roofing can be a cost-effective and efficient way to protect your home from the elements. Whether you’re replacing an old roof or adding a new one to a shed or outbuilding, DIY installation of rolled roofing can be a rewarding project. However, to ensure a successful installation, following the right steps and employing some helpful tips is essential. In this guide, we will walk you through the DIY installation of rolled roofing, providing valuable tips to make the task easier and more effective.
Rolled Roofing DIY Installation
1. Gather the necessary tools and materials:
Before you begin the installation, gather all the necessary tools and materials. Here is a list of essential items you’ll need for a successful DIY installation of rolled roofing:
1. Utility knife: Used for cutting the rolled roofing material to the desired size and trimming edges.
2. Roofing nails: Used to secure the rolled roofing material to the roof deck.
3. Hammer: Used to drive the roofing nails into place.
4. Chalk line: Used to create straight reference lines for accurate alignment during installation.
5. Measuring tape: Used to measure the length and width of the roof, ensuring precise cuts and proper coverage.
6. Roofing adhesive: Used for sealing seams and providing additional adhesion between overlapping sections of rolled roofing.
7. Paintbrush: Used to apply roofing adhesive or primer, if necessary.
8. Roofing underlayment or felt: Optional, but recommended for added protection and moisture resistance.
9. Roofing cement: Used for sealing and repairing small leaks or cracks.
10. Safety equipment: Safety goggles, gloves, and appropriate footwear to protect yourself during the installation process.
Having all these tools and materials ready before you start will ensure a smoother installation process, save time, and prevent unnecessary interruptions.
2. Prepare the surface:
To ensure a successful DIY installation of rolled roofing, gathering all the necessary tools and materials is important. Follow these steps:
1. Prepare the surface: Clean the roof, remove debris, and repair any damages or leaks.
2. Measure and cut: Use a measuring tape to measure the roof dimensions and cut the rolled roofing material to size with a utility knife.
3. Lay out the roofing material: Unroll a small section of the roofing material at one end of the roof, aligning it with the eave and allowing for proper overhang.
4. Secure the roofing material: Use roofing nails and a hammer to secure the material, driving the nails at regular intervals along the edges and through the roofing material and the underlying roof deck.
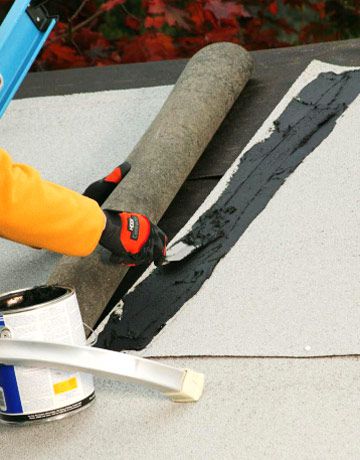
5. Overlap and seal the seams: Apply roofing adhesive along the overlap area between sections of the roofing material, press them together firmly, and smooth out any wrinkles or bubbles.
6. Trim and finish: Trim any excess material along the edges with a utility knife and apply roofing adhesive or sealant around vents or protrusions for a watertight seal.
7. Perform regular maintenance: Inspect the roof periodically, clear debris, and address any repairs promptly.
3. Measure and cut the roofing material:
Accurate measurements are essential to minimize waste and ensure a proper fit. Measure the length and width of the roof, accounting for any overhangs or edges. Transfer the measurements onto the rolled roofing material and cut it to the desired size with a straight edge or utility knife. Take your time during this step to avoid mistakes and potential wastage.
4. Install the rolled roofing:
Start by unrolling a small section of the roofing material at one end of the roof. Make sure it aligns properly with the eave and overhangs the edge by the recommended amount (typically 2-3 inches). Secure the roofing material in place using roofing nails. Hammer the nails in at regular intervals, approximately 6-12 inches apart, and ensure they penetrate the roofing material and the underlying roof deck. Repeat this process, unrolling and nailing the roofing material section by section until you reach the other end of the roof.
5. Overlap and seal the seams:
To prevent water infiltration, it’s crucial to properly overlap and seal the seams between each section of rolled roofing. Follow the manufacturer’s instructions for the recommended overlap width, usually around 3-6 inches. Apply roofing adhesive along the overlap area and press the sections firmly together. Smooth out any wrinkles or bubbles, ensuring a tight seal. Repeat this process for all seams, taking care to maintain consistent overlap and sealing.
6. Apply the finishing touches:
Once the rolled roofing is installed and the seams are sealed, adding the finishing touches is time. Trim any excess material along the edges using a utility knife for a clean and professional look. Inspect the entire roof for any loose nails or areas that need additional sealing. Apply a layer of roofing adhesive around vents, pipes, or any other protrusions to create a watertight seal.
7. Maintenance and regular inspections:
Regular maintenance and inspections are key to prolonging the lifespan of your rolled roofing. Keep an eye out for any signs of damage, such as cracks, tears, or loose seams. Clear debris and leaves from the roof regularly to prevent water buildup. Additionally, consider applying a roof coating or protective sealant to enhance the durability and weather resistance of your rolled roofing.
Here are 10 frequently asked questions (FAQs) about DIY installation of rolled roofing, along with their answers:
1. Q: Is rolled roofing suitable for all types of roofs?
A: Rolled roofing is commonly used for low-slope or flat roofs. It may not be suitable for roofs with steep slopes or complex architectural designs.
2. Q: Can I install rolled roofing over an existing roof?
A: Rolled roofing can be installed over an existing roof in certain cases. However, it’s important to ensure that the existing roof is in good condition and doesn’t have any underlying issues that may affect the new installation.
3. Q: How long does rolled roofing typically last?
A: The lifespan of rolled roofing can vary depending on factors such as the quality of the material, climate conditions, and maintenance. On average, rolled roofing can last around 10 to 15 years.
4. Q: Can I install rolled roofing on my own, or should I hire a professional?
A: Rolled roofing can be installed as a DIY project, especially if you have some experience with basic roofing tasks. However, if you’re unsure about your skills or if the roof is complex, it’s best to consult a professional roofer.
5. Q: Do I need to apply a primer before installing rolled roofing?
A: Priming is not always necessary for rolled roofing installation. However, in some cases, applying a primer can improve adhesion and enhance the longevity of the roofing material. Check the manufacturer’s instructions for specific recommendations.
6. Q: Can rolled roofing be painted?
A: Rolled roofing is typically not designed to be painted. It comes pre-finished in various colors to suit different aesthetic preferences.
7. Q: Is rolled roofing fire-resistant?
A: Rolled roofing materials have varying degrees of fire resistance. Look for products labeled as “Class A” for the highest level of fire resistance.
8. Q: How do I repair a damaged section of rolled roofing?
A: To repair a damaged section, carefully remove the damaged material, clean the area, and cut a new piece of rolled roofing to fit. Install the new section according to the manufacturer’s instructions and seal the seams properly.
9. Q: Can rolled roofing be used on a residential home or is it more suitable for outbuildings?
A: Rolled roofing can be used on both residential homes and outbuildings. However, it is commonly used for sheds, garages, and other structures rather than primary residential roofs.
10. Q: Can rolled roofing withstand extreme weather conditions?
A: Rolled roofing is designed to provide weather resistance, but its durability can vary. Higher-quality materials and proper installation techniques can help improve its ability to withstand extreme weather conditions.
Remember, while these answers provide general information, it’s always a good idea to consult the specific instructions and guidelines provided by the manufacturer of the rolled roofing material you choose, as they may have specific recommendations or requirements.
Summary
Installing rolled roofing can be a rewarding and cost-effective DIY project if you follow the right steps and employ useful tips. Remember to gather all the necessary tools and materials, prepare the surface adequately, measure and cut the roofing material accurately, and install it section by section, overlapping and sealing the seams properly. Don’t forget to perform regular maintenance and inspections to ensure the longevity and effectiveness of your rolled roofing. By following these top tips, you’ll be well on your way to a successful DIY installation of rolled roofing, providing reliable protection for your home for years to come.


