DIY Storage Shed: A Step-by-Step Guide to Building Your Own
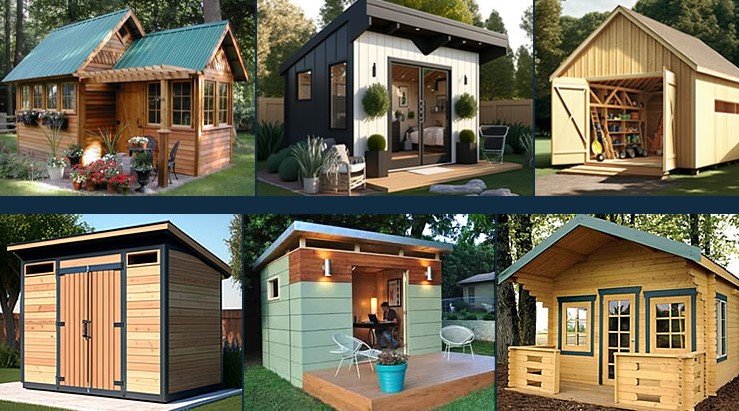
Are you in need of extra storage space but don’t want to break the bank? Building a DIY storage shed might be the perfect solution for you. By rolling up your sleeves and embracing your inner handyman, you can create a customized storage shed that fits your needs and budget. In this step-by-step guide, we will walk you through the process of building your own DIY storage shed, from planning to completion. Get ready to unleash your creativity and transform unused space into an organized haven.
DIY Storage Shed Planning
1. Planning for your Shed:
Before diving into the construction process, take the time to plan your DIY storage shed project thoroughly. Consider the size, layout, and location of your shed. Take measurements and think about the purpose of your storage space. This initial planning phase will ensure that your shed meets your specific needs.
2. Gathering Materials and Tools for the Shed:
To start building your DIY storage shed, gather all the necessary materials and tools. This may include pressure-treated lumber for the foundation, framing lumber for the walls and roof, plywood or oriented strand board (OSB) for the sheathing, screws, nails, hinges, latch, and roofing materials. Additionally, make sure you have the right tools on hand, such as a measuring tape, circular saw or handsaw, power drill, level, and carpenter’s square.
3. Build the Shed Foundation:
A sturdy foundation is crucial for the longevity of your DIY storage shed. Begin by clearing and leveling the ground where the shed will be placed. Depending on your preference and budget, you can use pressure-treated lumber or concrete blocks to create the foundation. Ensure that it is level and secure.
4. Framing the Shed Walls:
Using the measurements and layout determined during the planning phase, start framing the walls of your DIY storage shed. Cut the framing lumber according to your specifications and assemble the walls using screws or nails. Remember to leave spaces for doors and windows, if desired. Ensure that the walls are square and plumb for a solid structure.
5. Installing the Shed Roof:
Once the walls are in place, it’s time to install the roof. Cut the roof truss pieces to the appropriate length and attach them to the top plates of the walls. Add blocking between the trusses for additional support. Once the trusses are secured, sheath the roof with plywood or OSB, ensuring a secure fit.
6. Adding Doors and Windows:
Customize your DIY storage shed by adding doors and windows. Cut openings in the walls for the doors and windows and install hinges and a latch for the door(s). You can use purchased doors and windows or repurpose materials to fit your style and budget.
7. Finishing Touches:
Sand any rough edges to create a smooth finish. If desired, apply a coat of paint or stain to protect the shed from the elements. This step not only enhances the shed’s appearance but also increases its durability. Consider adding shelving or hooks inside to maximize storage and organization.
When it comes to creating extra storage space for your home or garden, a storage shed is an excellent solution. While there are many pre-built options available, building your own shed can be a rewarding and cost-effective project. In this blog, we will guide you through the process of building a cheap storage shed that suits your needs without breaking the bank. With the right tools, materials, and a little bit of DIY spirit, you’ll soon have a practical and budget-friendly storage solution right in your backyard.
 12,000 Shed Plans and Designs For Easy Shed Building! RyanShedPlans
"Build your dream shed with ease! Explore Ryan Shed Plans' collection of easy-to-follow designs and step-by-step instructions. Start your DIY project today!"
DIY Storage Shed Tools Needed:
1. Measuring tape
2. Hammer
3. Level
4. Circular saw or handsaw
5. Power drill
6. Screwdriver (Phillips and flathead)
7. Chalk line
8. Carpenter’s square
9. Clamps
10. Safety goggles
11. Work gloves
12. Ladder or step stool
13. Paintbrushes and rollers (optional)
14. Shovel (for leveling the ground)
Materials Needed:
1. Pressure-treated lumber or pallets for the foundation
2. 4×4 or 4×6 pressure-treated posts for the corner support
3. 2×4 or 2×6 framing lumber for the walls, roof, and trusses
4. Exterior-grade plywood or oriented strand board (OSB) for the walls and roof sheathing
5. Roofing materials (shingles, metal roofing, or corrugated panels)
6. Exterior-grade screws and nails
7. Hinges and latch for the door
8. Tar paper or roofing felt (optional)
9. Paint or stain (optional)
DIY Storage Shed Step-by-Step Guide:
1. Planning:
– Determine the size and layout of your shed based on your storage needs and available space.
– Check local building codes and regulations for any permits or restrictions.
2. Foundation:
– Clear and level the ground where the shed will be placed.
– Construct a simple foundation using pressure-treated lumber or repurposed pallets. Ensure it is sturdy and level.
3. Frame the Walls:
– Cut the 2×4 or 2×6 lumber to the desired wall height and length.
– Attach the walls together using screws or nails, ensuring they are square and plumb.
– Install additional studs for added stability.
4. Install the Roof Trusses:
– Measure and cut the truss pieces using 2×4 or 2×6 lumber.
– Secure the trusses to the top plates of the walls, evenly spaced.
– Install blocking between the trusses for added support.
5. Sheathing and Roofing:
– Cover the walls and roof with exterior-grade plywood or OSB, securing them with screws or nails.
– Apply tar paper or roofing felt to the roof for extra weather protection.
– Install the chosen roofing material (shingles, metal roofing, or corrugated panels) according to the manufacturer’s instructions.
6. Add Doors and Windows:
– Cut out openings for the doors and windows as desired.
– Install hinges and a latch for the door(s).
– If desired, add windows using purchased or repurposed materials.
7. Finishing Touches:
– Sand any rough edges and apply paint or stain to protect the shed from the elements.
– Consider adding shelving or hooks inside for better organization.
– Install any additional features such as gutters or a ramp, based on your needs.
DIY Storage Shed Frequently Asked Questions
1. Q: How much will it cost to build a DIY storage shed?
A: The cost of building a DIY storage shed can vary depending on factors such as size, materials used, and location. However, a budget-friendly storage shed can typically be built for a few hundred to a couple of thousand dollars.
2. Q: How long does it take to build a DIY storage shed?
A: The time required to complete a DIY storage shed project depends on factors like your level of experience, the shed’s size, and the complexity of the design. It can take anywhere from a few days to a couple of weeks to finish the construction.
3. Q: Do I need a building permit to construct a DIY storage shed?
A: Building permits requirements vary depending on your location and the size of the shed. It’s important to check with your local building department to determine if a permit is needed for your specific project.
4. Q: What tools do I need to build a DIY storage shed?
A: Some essential tools for building a DIY storage shed include a measuring tape, circular saw or handsaw, power drill, level, hammer, screwdriver, and carpenter’s square. Additionally, having safety goggles and work gloves is highly recommended.
5. Q: Can I build a DIY storage shed if I have limited construction experience?
A: Absolutely! Building a DIY storage shed is a great project for beginners. With careful planning, research, and access to online resources or instructional materials, you can successfully build your own shed, even with limited construction experience.
6. Q: What materials should I use for the shed’s foundation?
A: Common options for shed foundations include pressure-treated lumber, concrete blocks, or gravel pads. Pressure-treated lumber or concrete blocks offer stability and durability, while gravel pads provide adequate drainage.
7. Q: How do I ensure my DIY storage shed is structurally sound?
A: To ensure the structural integrity of your shed, it’s important to use appropriate framing techniques, secure all connections with screws or nails, and make sure the shed is level and plumb. Adding cross-bracing or extra studs for stability is also recommended.
8. Q: Can I customize the design and size of my DIY storage shed?
A: Yes, one of the advantages of building a DIY storage shed is the ability to customize the design and size according to your needs. You can modify the layout, add windows or skylights, and choose the finishing details that suit your preferences.
9. Q: What roofing material is best for a DIY storage shed?
A: Common roofing materials for DIY storage sheds include asphalt shingles, metal roofing, or corrugated panels. Consider factors such as durability, cost, and the shed’s aesthetic appeal when choosing the roofing material.
10. Q: How do I maintain and protect my DIY storage shed?
A: Regular maintenance is important to extend the lifespan of your DIY storage shed. This includes checking for any water leaks, applying fresh paint or stain as needed, and keeping the surrounding area clear of debris. Additionally, ensure proper ventilation to prevent moisture buildup inside the shed.
Remember, while these FAQs provide general guidance, it’s always a good idea to consult local building codes and regulations, as well as seek professional advice when necessary, to ensure a successful and compliant DIY storage shed project.
 12,000 Shed Plans and Designs For Easy Shed Building! RyanShedPlans
"Build your dream shed with ease! Explore Ryan Shed Plans' collection of easy-to-follow designs and step-by-step instructions. Start your DIY project today!"
Conclusion:
Building a DIY storage shed is an excellent way to create extra storage space while staying within your budget. With careful planning, the right materials, and a bit of DIY enthusiasm, you can construct a customized storage shed that meets your specific needs. By following this step-by-step guide, you’ll be well on your way to transforming unused space into a functional and organized haven. Embrace the challenge, enjoy the process, and revel in the satisfaction of completing your own DIY storage shed project.


